Fuselage
This was the make or break stage for the whole model. Get the proportions wrong here and the end result could be disastrous. There was a lot of seconding guessing myself and balancing components precariously. Eventually a solution presented itself.

The twin tails of the Valkyrie formed the sides with the top of the Valkyrie becoming the top rear of the fuselage. The inserts that would have attached to the inside edges of the tails became the bottom sections of the rear fuselage.

At this point the fuselage had taken on a beautiful taper. I also had a straight line running the length of the model from which to build put from. Brilliant. All that was left for this phase of the build was adding a plasticard strip to the bottom of the structure.

Wings
The Valkyrie provides a sturdy pair of wings and jet engines. To begin I attached the engines to the wings. The engines are tapered on one side due to how they sit on the parent kit; it was crucial at this point to fix the wings on the centre line and not be distracted by the flat surface. As the front of the Plunderbolt will be heavily built up I elected to have the detail side of the jets downwards where they could be admired.

As to the positioning of the wings I played around until the proportions looked right. As there wasn't a specific plan here you could say I was... winging it.
Nose
I had intended to save time by adjusting the front of the tail sections. After a few failed attempts I figured it was best to put in the work and do the job properly. Quick application of a hobby saw removed the front from which I took measurements to guide the drafting process.

I'd love to say the drafting process was all my own work. It was based heavily on the designs in a papercraft Thunderbolt pattern I had studied beforehand.

At this stage I neglected to fill the gap in the turbine casing. An oversight I came to regret later.
Engine Casing
To get the iconic look of the Thunderbolt I needed to build up from this base. No point going with sleek and speedy when you can make it a celebration of Brutalist principles.
This process required several different layers, each building on the previous and tapering up over the fuselage. Key features of the design include the chunky cabling over each engine and the vents either side of the cockpit.

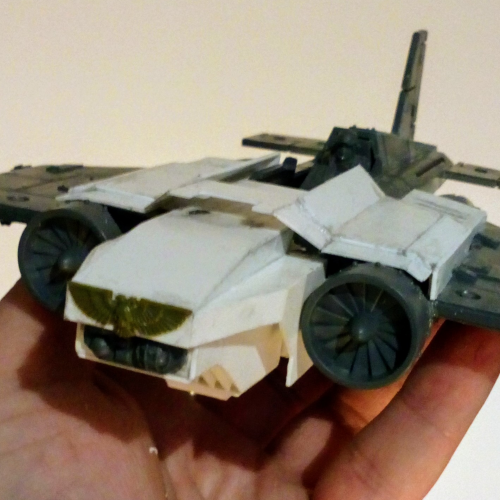
The Plunderbolt started to look really nice as the engine casing took shape. Due to slight variations it was necessary to tailor each side rather than making one template for both. On some models this isn't an issue but I wanted smooth transitions between sections. It was worth the extra effort. The image above shows the gaps in the turbine casing I had neglected to cover and still hadn't noticed at this stage.
Fuselage revisited
It was time to taper. A fine balance between raising the height of the fuselage to fit the iconic cabling each side... and not completely obscuring the pilot's forward view. I made a habit of placing the canopy on the cockpit regularly to get a feel for the overall proportions.
Greebling
My golden rule for terrain making is 'texture, texture, texture'. When making a model like this we need a fancier term: Greeble. Essentially sticking stuff on a boring shape to make it look cooler.
The key additions were the forward guns, side vents, cabling, a few rivets and probably 100 indents on the panels to match the fixings on the wings. I also took the time to fill a few gaps and cover a few mistakes with milliput.

What next?
Like an Ikea cabinet I was left with a few spare bits and bobs once the build was finished. Largest being a troop hold. Pulling out the blue stuff I took a quick mould of the turbines and set to work...

What could I be up to? None other than that lifty boi the Arvus Lighter... or in this case the 'Cheapass Lighter.'

Stay tuned for updates.